
My Claude Code Workflow And Personal Tips
How I use roadmap + task files to manage Claude Code, and my personal tips for effective Claude Code usage.

I have shared bits and pieces of my current coding workflow with Claude Code (and Cursor).
Many people wanted to know more details and the exact setup I use, so here it is, along my personal tips on how to use Claude Code effectively.
My Current Workflow Setup
ROADMAP.md
Have a ROADMAP.md file inside reference folder: reference/ROADMAP.md.
The ROADMAP.md describes two things:
The overall development process
The high level overview of each task in a few bullet points
The ROADMAP.md file acts as the single entry point to planning out new features, adjusting priorities and working on new tasks.
Make sure to include the ROADMAP.md file explicitly inside CLAUDE.md (via the CLAUDE.md import syntax) or Cursor rules (via reference).
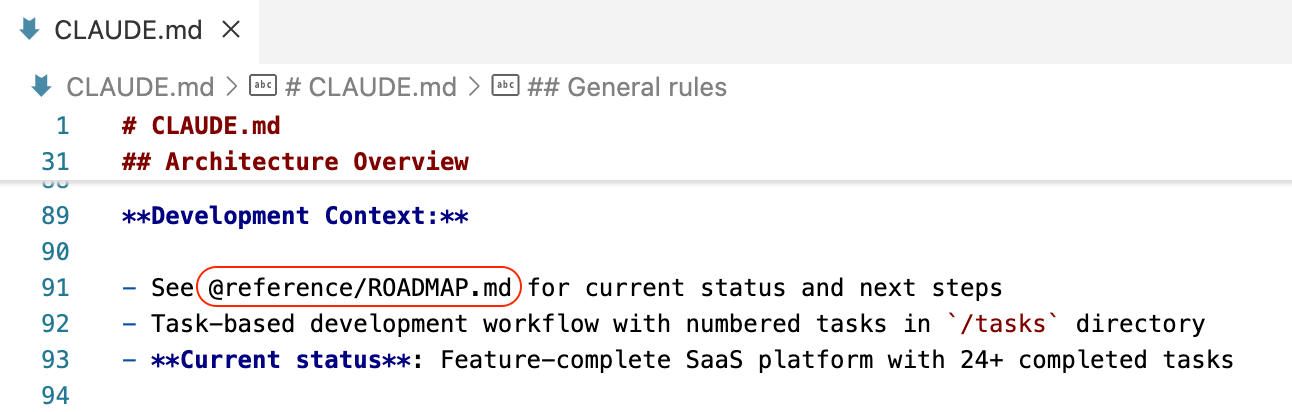
You can verify that the import is working by using the /status command inside Claude Code, it should print out full the memory import structure:
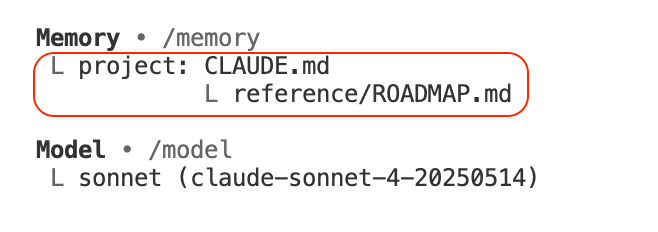
By explicitly including the file as part of memory / rules, the agent has access to the full high-level context of the project for each task, effectively grounding the agent and guiding it to the correct path.
Here’s an excerpt of my current ROADMAP.md for my new app 16x Writer, which describes the development workflow and high-level tasks / features:
# 16x Writer Development Roadmap

Web platform for AI-assisted writing and editing of blog posts.

## Overview

// High-level overview of the project, what it does, the main features

## Development Workflow

1. **Task Planning**

- Study the existing codebase and understand the current state
- Update `ROADMAP.md` to include the new task
- Priority tasks should be inserted after the last completed task

2. **Task Creation**

- Study the existing codebase and understand the current state
- Create a new task file in the `/tasks` directory
- Name format: `XXX-description.md` (e.g., `001-db.md`)
- Include high-level specifications, relevant files, acceptance criteria, and implementation steps
- Refer to last completed task in the `/tasks` directory for examples. For example, if the current task is `012`, refer to `011` and `010` for examples.
- Note that these examples are completed tasks, so the content reflects the final state of completed tasks (checked boxes and summary of changes). For the new task, the document should contain empty boxes and no summary of changes. Refer to `000-sample.md` as the sample for initial state.

3. **Task Implementation**

- Follow the specifications in the task file
- Implement features and functionality
- Update step progress within the task file after each step
- Stop after completing each step and wait for further instructions

4. **Roadmap Updates**

- Mark completed tasks with ✅ in the roadmap
- Add reference to the task file (e.g., `See: /tasks/001-db.md`)

## Development Phases

- **Task 001: Database Schema** ✅ - Complete
  - See: `/tasks/001-db.md`
  - Implemented 5 core tables: `context`, `prompts`, `posts`, `post_versions`, `post_context`
  - Added UUID primary keys and proper relationships
  - Created CRUD operations and seed data
  - Generated migration files

- **Task 002: Source Library UI** ✅ - Complete

  - See: `/tasks/002-source-library.md`
  - ✅ List view with filtering and search functionality
  - ✅ Add/edit source forms with comprehensive metadata fields
  - ✅ Grid/list view toggle for source display
  - ✅ Source management with CRUD operations
  - ✅ API endpoints for source management (`/api/sources`)
  - ✅ Real-time source list with SWR for data fetching
  - ✅ Delete confirmation dialogs and optimistic updates

- **Task 003: End-to-End Testing** ✅ - Complete

  - See: `/tasks/003-e2e-testing.md`
  - ✅ Playwright setup with TypeScript support
  - ✅ Authentication flow tests (sign up, login)
  - ✅ Source library CRUD tests
  - ✅ Test environment configuration
  - ✅ CI/CD integration

// More tasks...
I have published the full ROADMAP.md on GitHub for your reference.
Individual Task Plans
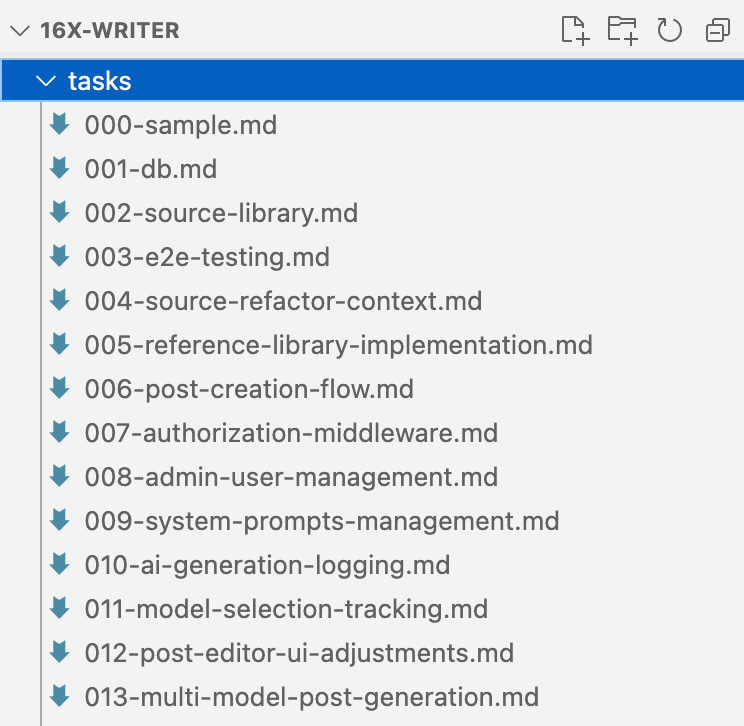
While ROADMAP.md gives the high-level overview of each task, the detailed planning of each task is carried out separately as individual files inside tasks folder:
001-db.md002-source-library.md003-e2e-testing.md004-source-refactor-context.md…
You can think of these files are a combination of PRD (product requirement document) and system design (architecture) for each feature. Each file includes the following components:
Prerequisites
Background and requirements
Current state and desired states
Implementation steps
Files that needs to modified and created
Acceptance criteria
Here is an excerpt of a sample task planning file:
# Task 012: Post Editor UI Adjustments

## Progress Summary

**Status**: Not Started

- [ ] Step 1: Create Version Navigation Component
- [ ] Step 2: Create Compact Info Bar Component
- [ ] Step 3: Create User Prompt Display Component
- [ ] Step 4: Implement Version Navigation Logic
- [ ] Step 5: Refactor Post Detail Page Layout
- [ ] Step 6: Update PostEditor Component
- [ ] Step 7: Testing and Polish

## Overview

Refactor the post editor UI to be more concise and user-friendly by:

- Removing the extra info column on the right side from the post editor
- Putting concise info (versions, context) above the editor in one row
- Adding navigation to previous and future versions of the post
- Removing the post content preview at the bottom of the post editor
- Showing the user prompt at the bottom of the post editor as read-only reference

## Current State Analysis

### Current Layout Structure

The post detail page (`/dashboard/posts/[id]/page.tsx`) currently uses a 3-column grid layout:

- **Main Content (2/3 width)**: PostEditor component + Current Content Preview card
- **Sidebar (1/3 width)**: VersionHistory + PostContextManager + Post Information cards

### Current Components

- `PostEditor` - Main editing interface with title, content, status, and change summary
- `VersionHistory` - Sidebar component showing all versions with selection capability
- `PostContextManager` - Sidebar component for managing sources and references
- `Current Content Preview` - Card showing the current version content below the editor

## Target State

### New Layout Structure

- **Header**: Post title, metadata, and status (unchanged)
- **Info Bar**: Concise version info, context counts, and version navigation in one row
- **Main Editor**: Full-width PostEditor component (no sidebar)
- **User Prompt Reference**: Read-only display of the user prompt at the bottom

### UI Improvements

1. **Consolidated Info Bar**: Display version count, context counts, and navigation controls
2. **Version Navigation**: Previous/Next buttons to navigate between versions
3. **Simplified Layout**: Remove sidebar, make editor full-width
4. **User Prompt Display**: Show the current version's user prompt as reference

## Implementation Steps

### Step 1: Create Version Navigation Component

Create a new `VersionNavigation` component that provides:

- Current version indicator (e.g., "Version 3 of 5")
- Previous/Next navigation buttons
- Version selection dropdown for quick access
- Compact design suitable for horizontal layout

**Files to create/modify:**

- `components/posts/version-navigation.tsx` - New component
- `components/posts/index.ts` - Export new component

### Step 2: Create Compact Info Bar Component

Create a new `PostInfoBar` component that displays:

- Version navigation (using VersionNavigation component)
- Context counts (X sources, Y references)
- Quick access to context management
- Model information for current version

**Files to create/modify:**

- `components/posts/post-info-bar.tsx` - New component
- `components/posts/index.ts` - Export new component

// Steps 3-7...

## Acceptance Criteria

### Functional Requirements

- [ ] Version navigation works correctly (previous/next buttons)
- [ ] Version selection dropdown shows all versions
- [ ] ...

### UI/UX Requirements

- [ ] Layout is more compact and user-friendly
- [ ] No sidebar on the right side of the editor
- [ ] ...

### Technical Requirements

- [ ] No breaking changes to existing API endpoints
- [ ] Component reusability maintained
- [ ] ...

## Files Involved

### New Files

- `components/posts/version-navigation.tsx`
- `components/posts/post-info-bar.tsx`
- `components/posts/user-prompt-display.tsx`

### Modified Files

- `app/(dashboard)/dashboard/posts/[id]/page.tsx`
- `components/posts/post-editor.tsx`
- `components/posts/index.ts`

### Potentially Affected Files

- E2E tests related to post editing
- Any components that depend on the current layout

## Notes

- Maintain backward compatibility with existing data structures
- Ensure the new layout works well on both desktop and mobile
- ...

## Dependencies

- Existing post detail API endpoints
- Current PostEditor component functionality
- ...
I have published the full task plan sample file on GitHub for your reference.
Note that with the non-deterministic nature of AI agents, the plan is merely a guide for the agent, not a rule that the agent will follow 100%.
I have observed that agents tend to overlook certain instructions or requirements inside the document, especially when the task is complex, or when the initial planning was not very clear on specific parts of the task.
So it is best to treat it as a draft plan that the agent can reference during the implementation, instead of expecting it be followed religiously.
Claude Code now has a planning mode which performs a similar function as the task planning files. However, the task planning files are still useful. They can serve a persistent reference for future features, as it is part of the repo, and can be accessed easily by humans and agents alike. Claude Code plans are not persistent and are gone after you start a new session.
Ad Hoc Tasks and Refactoring
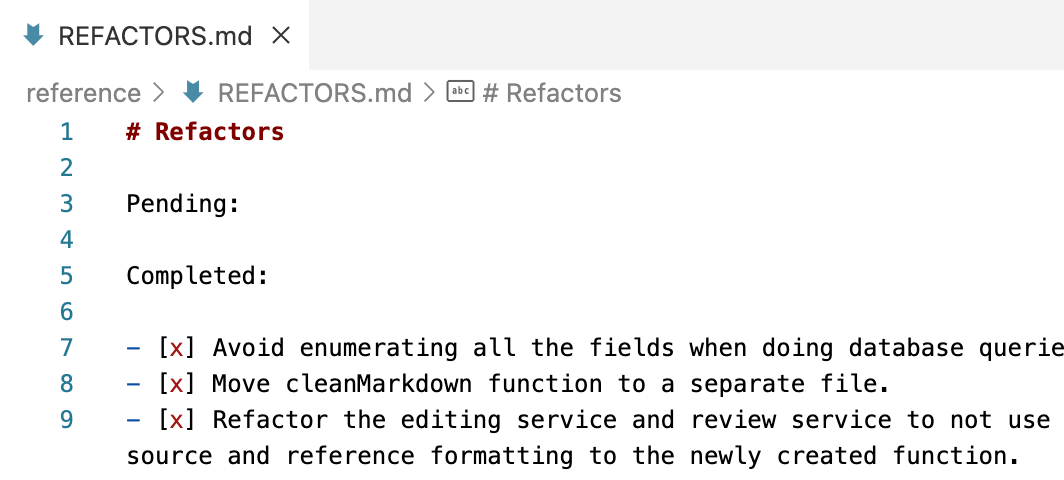
I also have a dedicated file for tracking ad hoc tasks that are too small for ROADMAP.md, but also significant enough to warrant recording-keeping. They reside inside reference/AD_HOC_TASKS.md and reference/REFACTORS.md.
I mainly use them for small enhancement features and refactoring that are worth keeping track of. While you can just prompt the coding agent to work on them directly, tracking them inside a file have some benefits:
For example, when working on a big feature, you notice a small refactoring is needed. You can record it inside
reference/REFACTORS.mdfirst and then prompt agent to work on it later.With the advancement of background async agents, you could also have agents that periodically analyse the codebase, record down refactoring and enhancement opportunities inside the file. Then you can spawn another set of agents to work on them autonomously.
Folder Structure Setup
Here’s an tree overview of the folder structure of my current setup:
$ tree -L 2
├── README.md
├── reference
│   ├── AD_HOC_TASKS.md
│   ├── AGENT.md
│   ├── BUGS.md
│   ├── REFACTORS.md
│   ├── ROADMAP.md
├── tasks
│   ├── 000-sample.md
│   ├── 001-db.md
│   ├── 002-source-library.md
│   ├── 003-e2e-testing.md
│   ├── 004-source-refactor-context.md
│   ├── 005-reference-library-implementation.md
│   ├── ...
My Claude Code Workflow
Since most of the workflow is already described in the ROADMAP.md file, the exact workflow I use is quite simple to describe.
For big features:
Describe my requirement (in a few sentences) to the agent, which would update
reference/ROADMAP.mdto add a new task with high-level summaryReview the summary captured by the agent and adjust them if necessary (remove unnecessary features, or take care of special interactions)

Ask agent to write more detailed plan in individual task files inside
tasksfolder
Note that inside ROADMAP.md, I have instructions for the agent to study the existing codebase and understand the current state before writing the plan, as part of the development workflow. This guides the agent to retrieve relevant context before planning.
Review the plan generated to see if it is on the right track
Prompt the agent to make amendments to the plan if necessary
Once you are happy with the plan, exit the current session or clear the agent’s context and start a new session with fresh context, so that you get maximum context window for the actual implementation.
Ask agent to implement one step at a time (pause after each step and await for human review), or complete the whole task (don’t pause after each step, just proceed to next step automatically until the whole task is completed)
For small enhancements or refactoring:
Record tasks inside
reference/AD_HOC_TASKS.mdorreference/REFACTORS.mdAsk Claude Code to implement one-by-one
Do one task per session (Use
/clearcommand or restart Claude Code) to avoid wasting tokens (sending context from previous task to the next task)
One-Shotting Multi-Step Tasks
Lately I have been asking the agent to just work on the task from start to finish instead of waiting for me to approve each step.
The internal TODO list of Claude Code is capable of breaking down the task according to the steps in my plan, and executing all of them within one single session.
I found that Claude Code is currently (as of July 2025) capable of working on a task autonomously for about 10-20 minutes, after which the effectiveness goes down as the context gets filled up.
In contrast, Cursor would give you a warning or stop working after 25 tool calls (which typically happens around 5-10 minutes or less).
For most of my tasks (consisting of 5-8 steps) on the 16x Writer project, Claude Code was able to complete the task in one session within the context limit, without triggering automatic context compression.
One area that Claude Code still struggles is UI-related debugging (fixing e2e testing). I haven’t tried connecting it to a Playwright MCP due to issues I have with MCP, but I suspect it could help in this particular use case.
3rd Party Tools for Claude Code
I use the following tools alongside Claude Code:
Cursor IDE for providing LSP diagnostic support and GUI for code review
Wispr Flow or similar tool for voice dictation (much faster than typing)
ccusage to track how much API usage you would have incurred if you were paying for API instead of Claude subscription
Personal Tips for Claude Code
Here are some tips that I personally use, to get the most out of Claude Code:
Keyboard shortcuts inside prompt box
Option + Left / Right Arrow to Jump to previous word or next word
Command + Left / Right Arrow to Jump to start of line or end of line
Use Ctrl+W to delete full words (Not command + W)
Keyboard navigation are especially useful when voice dictation makes a mistake
Hit “Esc” key twice to edit the previous prompt.
Useful for correcting typos or adding clarifications if you see the agent going off the wrong track.
Setup custom commands for commonly used tasks such as “work on next task”, “refactor code” or “commit all current changes”. In this way, you can trigger these commands quickly without typing the prompt over and over.

Bypass permissions (auto-accept) by default
By default you need to press Shift + Tab to toggle on auto-accept, but you can skip this step by using
--dangerously-skip-permissionsflagI personally setup an alias called
ccto automate this step:alias cc="claude --dangerously-skip-permissions"
This way, I don’t need to toggle auto-accept for each new session
Better local code review experience
Claude Code does not open edited files inside IDE by default when auto-accept is on, making local code review quite tedious, especially when changes are across multiple files
You can use the source control tab in Cursor / VS Code to view the list of changed files and open them quickly

Lastly, remember to check out Claude Code docs regularly for new features or official guides.
For example, there is a new feature called hooks that you might want to use for enforcing checks.
Other Projects and Ideas
Here are some other interesting projects and ideas on Claude Code, that I haven't personally used, but are worth checking out:
GUI for Claude Code
Tell Claude you have ast-grep
Background agents for long running tasks
Full ROADMAP.md file and sample task planning file available on GitHub
Looking for a tool to test out different models and prompts? Check out my new app: 16x Eval

16x Eval is a desktop application giving you a local workspace for prompt engineering and model evaluation.
Setup your own personal evals in minutes. Experiment with different combinations of prompts and models to find the best fit for your use case.
For anything with a web UI I've been handling the E2E testing by telling CC to make (and then execute) a plan for Selenium to do it. :)
Very helpful article. Actually, I think most of us did realize by now planning docs are necessary, I have used them extensively with Cursor even before I added Claude Code to the mix. Another good idea is to divide the project into "zones" and concentrate our reviews and full attention only on the core where AI's mistakes might really matter.